Are you having trouble sending WordPress emails and notifications to your Gmail or Gsuite email? This is a common issue with both Gmail and Gsuite (and other email hosting services). There are well known reasons for why it’s happening, and what you can do about it. Let’s take a look.
Google is very aggressive in their battle with email spammers. If an email originates from the same domain that it’s destined for, Google will often assume it’s being spoofed. This can result in the message getting sent to the spam folder, or worse – never getting delivered at all. WordPress is by default set to send email using the PHP mail function. Without proper authentication, the messages may not get delivered.
There are a couple of ways around this issue, I’ll briefly touch on one, and go more in depth on the other.
Option 1: Use a Third-Party SMTP Service
Perhaps the quickest way to ensure emails are delivered to your Gsuite email is to use a third-party SMTP service provider. Services like Sendinblue, Mailgun, and Sendgrid. Each service has different features and pricing, but from an email deliverability perspective, they all route your messages through their system and ensure proper authentication.
We’ve used Sendgrid for a number of customers, it’s easy to set up using their plugin and connecting to the account. Checkout the Sendgrid / WordPress documentation to get set up.
Option 2: Gsuite SMTP / Google API
While a third-party service like those above are a solid, easy option, if you use Gsuite to host email, you can use Google’s API to securely authenticate your site’s emails. It’s a little more work than option 1, but it’s free and eliminates yet another service in your life. Here’s a step by step on how to do so:
- Set up WP Mail SMTP Plugin
- Create a Project in Your Google Account
- Authorize and send a test email
- Troubleshooting
1. Set up WP Mail SMTP Plugin
Install WP Mail SMTP through the plugins section in WordPress. Search for WP Mail SMTP and install. You can also download WP Mail SMTP from the WordPress.org plugin repository, upload, and activate it.
Once activated, go to WP Mail SMTP » Settings. There are a few things that need to be set here, although they may already be filled in.
From Email: This is the email address that will be associated with the emails that get sent out. You can actually skip this – Google will force the email to match the email in the account you add later. Once you do, this field will become disabled.
From Name: This is the name that will be associated with the emails that go out. This can be set to what ever you wish. Check the Force From Name checkbox if you want to ensure all emails use this setting.
Set the return-path to match the From Email: Check this box to ensure you get notified if any emails bounce back from the recipient.
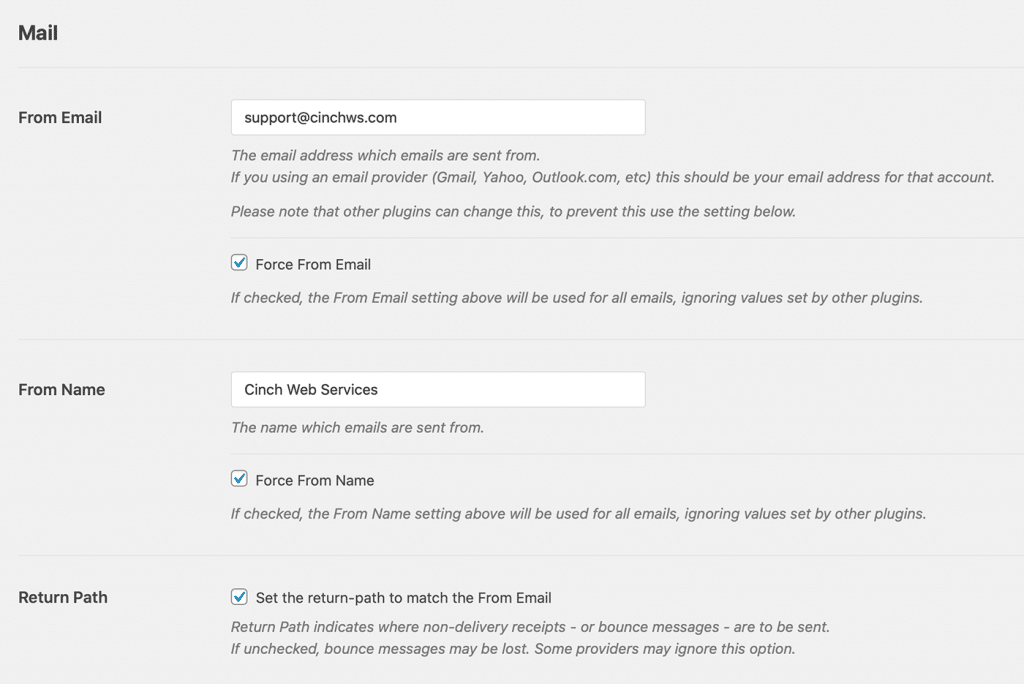
Next choose Gmail from the Mailer section:

Below this section you will see settings for Gmail Client ID and Client Secret. The next step is to create these credentials in Gsuite, so save these settings as they are, we’ll come back to finish them later.
2. Create a Project in Your Google Account
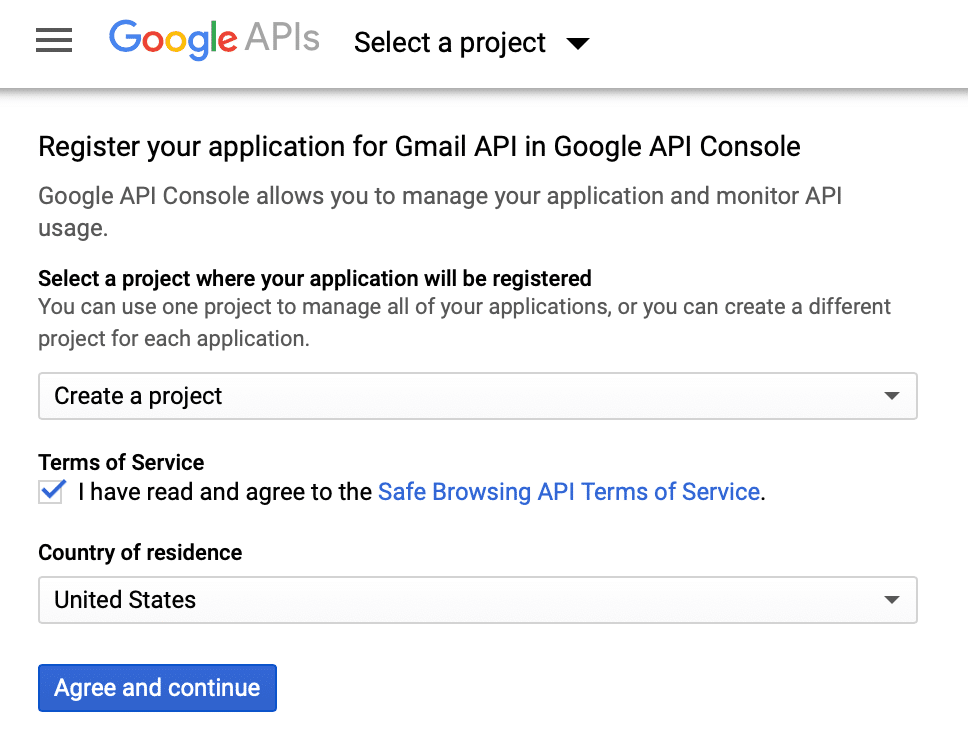
The next step is to log into your Google account and start a new project in Google APIs. This link will take you to a page to register your application. We will be setting up a new project, so leave the first dropdown as Create a project. Agree to the terms and click Agree and continue:
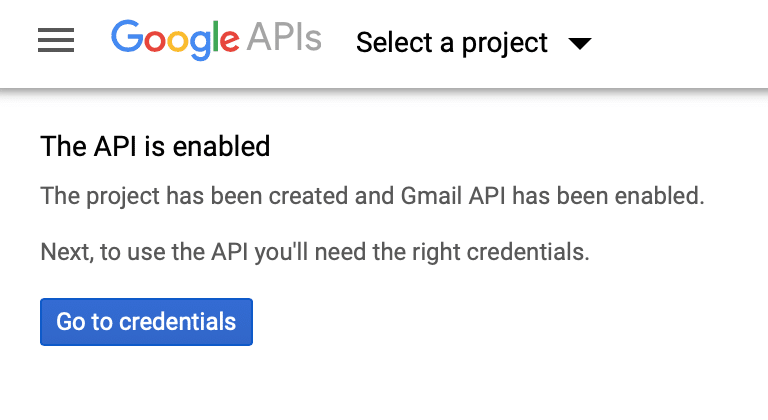
The next screen you will come to will let you know the API is enabled, and you can click the the Go to credentials button:
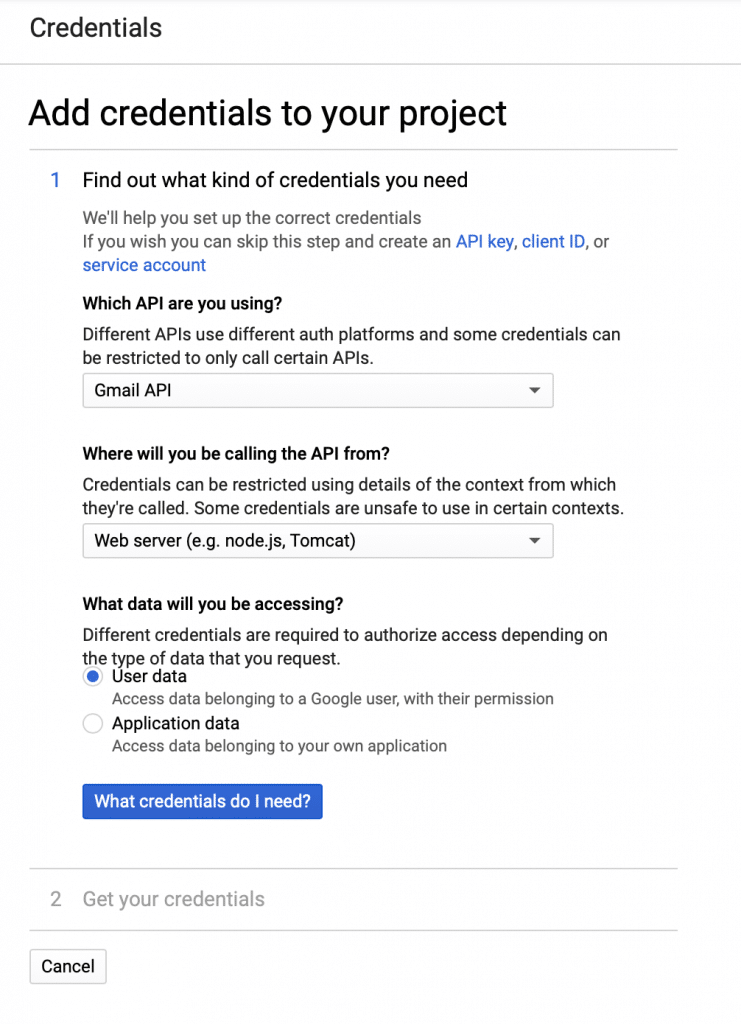
The next screen contains a few questions that will tell Google what credentials you need. Here’s how to answer:
- Which API are you using: Gmail API
- Where will you be calling the API from: Web Server
- What data will you be accessing: User data
Once you click on the What credentials do I need? button, a modal popup will appear. Click on Set up consent screen:
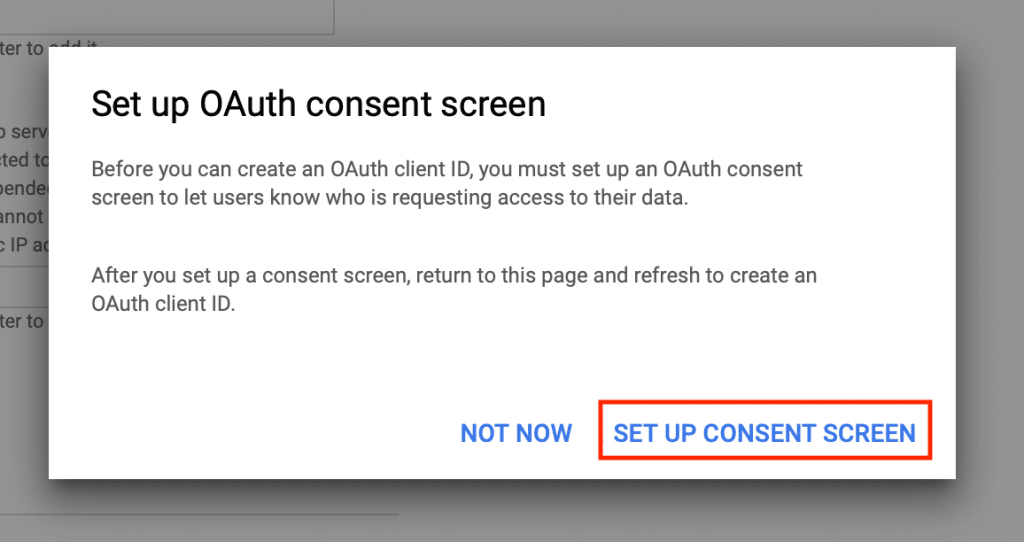
Clicking on the link will open a new tab. Be sure to keep the original tab open as we will come back to it shortly.
The new tab page will be the OAuth consent screen. You will first be asked to choose a user type. Choose Internal and click the Create button:
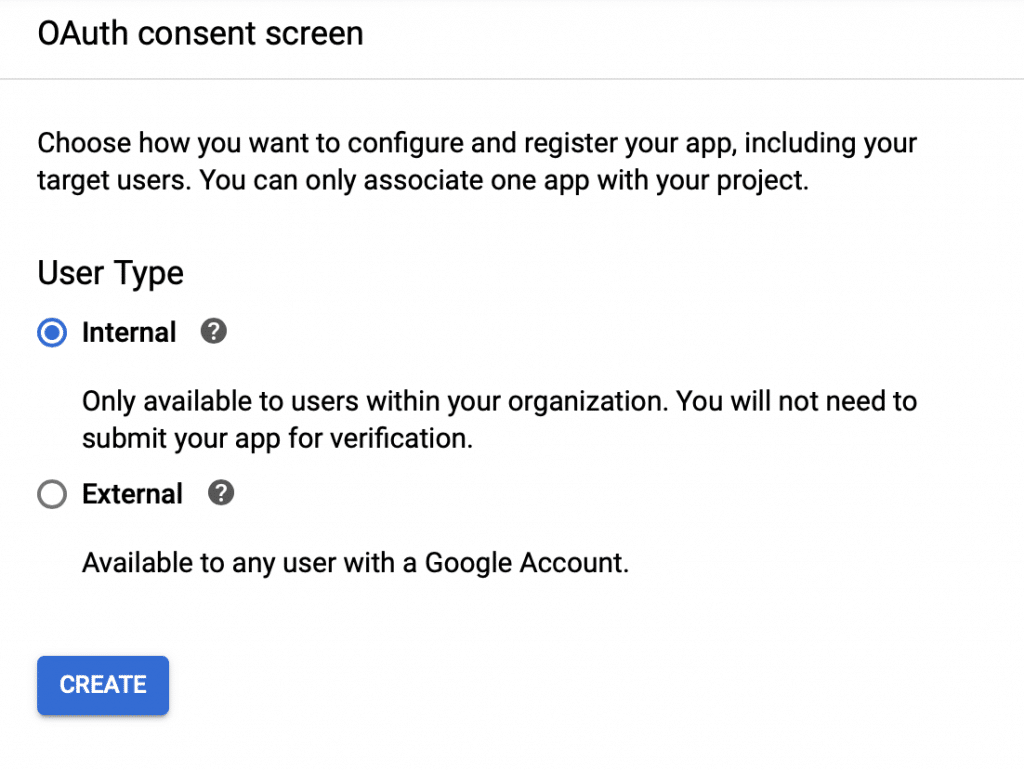
On the next screen you will add a few bits of information:
Application Type: Leave this as Internal
Application name: Choose a name that sounds logical to you. If you have more than one application, be specific to avoid confusion.
Support Email: Leave as the default email address
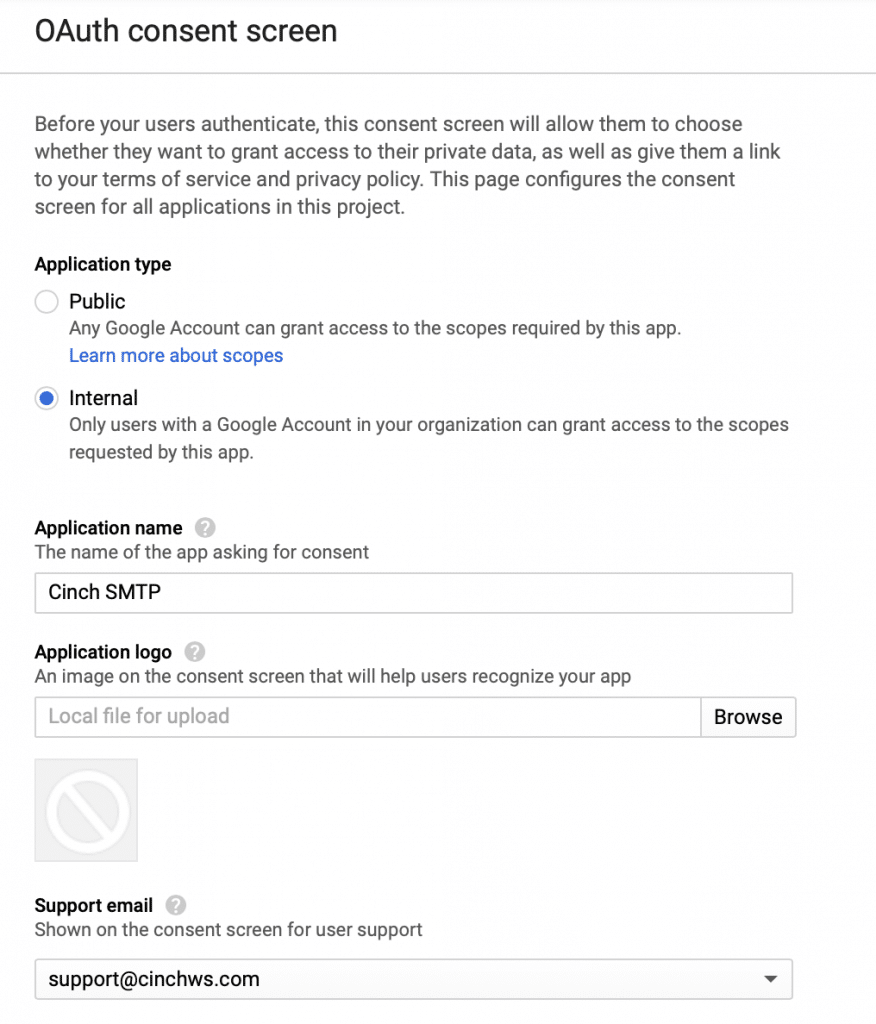
Below this, on the same screen you’ll fill in Authorized domains and link information. In the Authorized domains section add your website without https://
For the Application Homepage link, Application Privacy Policy link, and Application Terms of Service link, add your website, this time with the https://. You don’t need to add the actual link, this page will only ever be seen by you. We’ve added them for flavor.
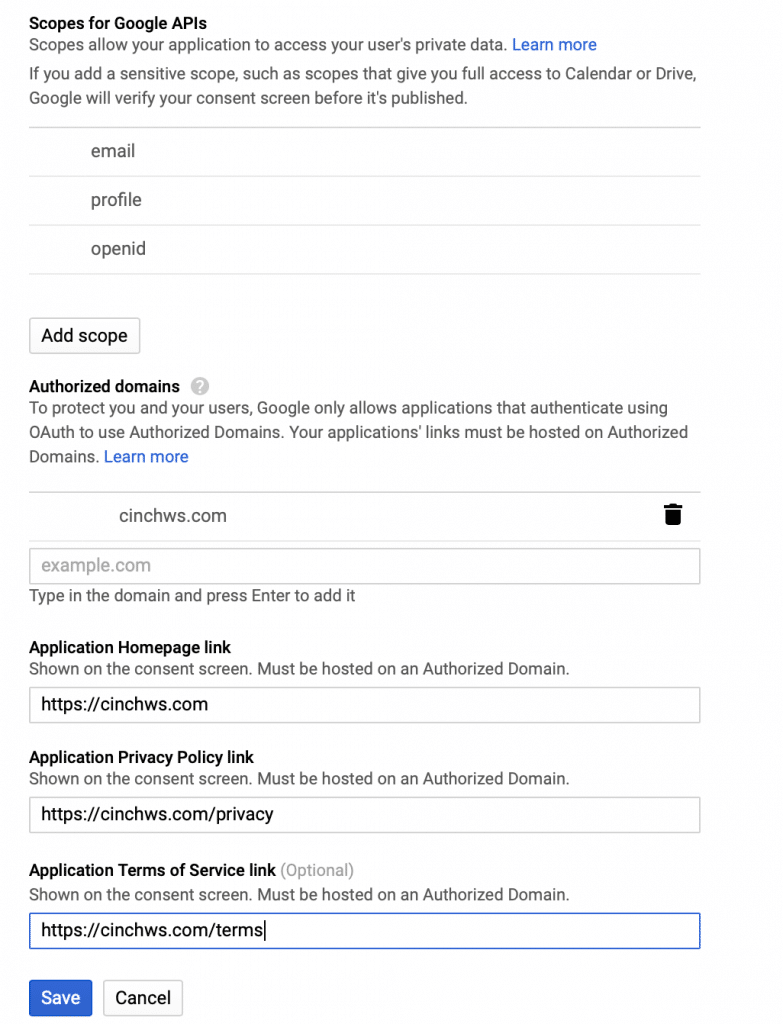
When you’ve filled everything out, click Save. If you are not taken back to the Credentials screen, click on Credentials in the left navigation, then choose Create Credentials:
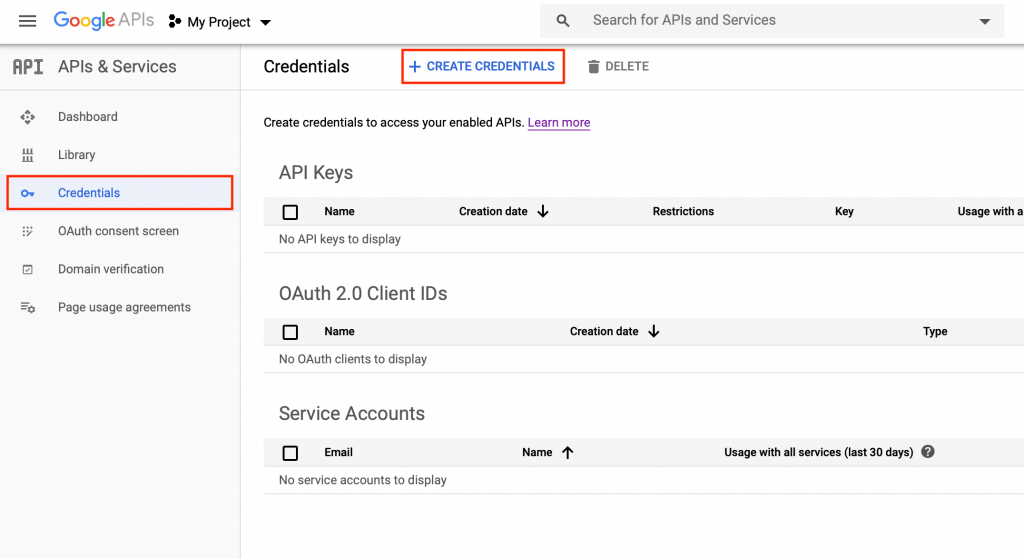
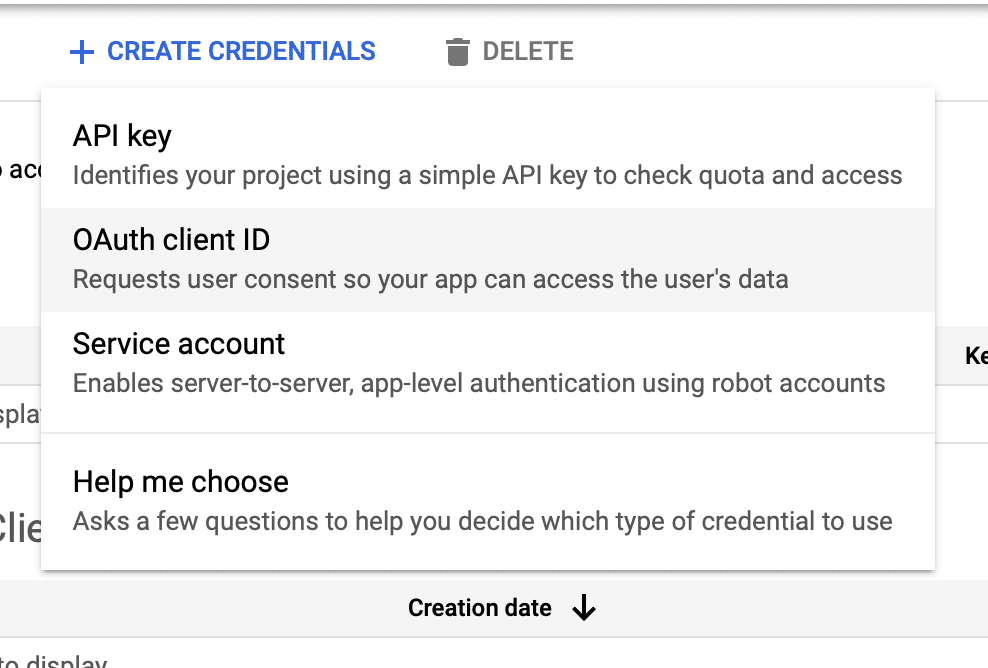
Clicking the Create Credentials link will open a little dropdown to chose what type of credentials to create. Choose OAuth client ID:
The next screen will be the Create OAuth client ID page. Here’s how to fill out each of the sections:
- Application type: Web application
- Name: Choose any name that makes sense, or leave default
- Authorized JavaScript origins: enter your website URL
- Authorized redirect URIs: This information is back on the WP Mail SMTP » Settings page. I will explain this more below
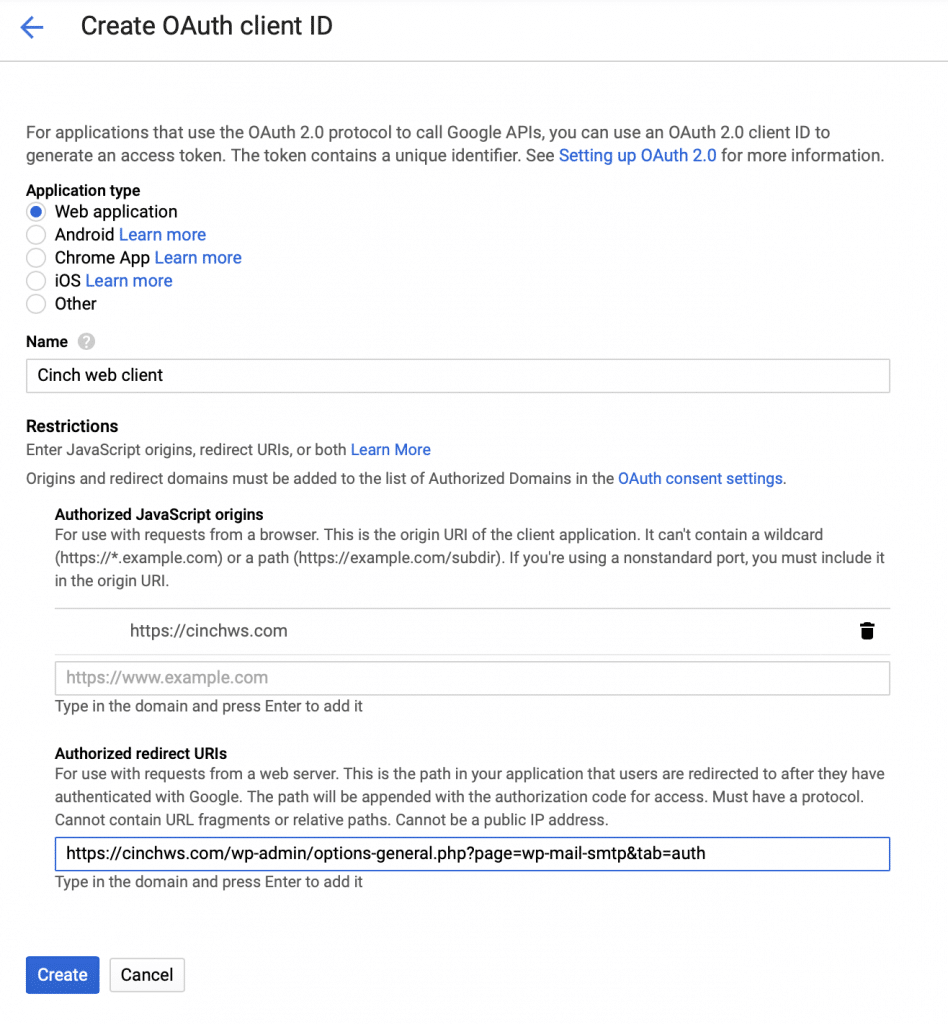
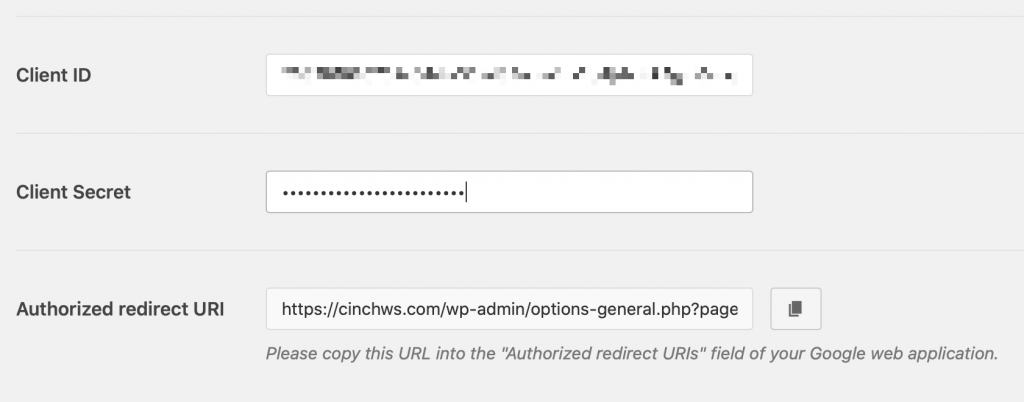
Back at the WP Mail SMTP » Settings page, look for the Authorized redirect URI section. Click the copy button and paste the link into the Authorized redirect URI field on the Create Oauth client ID. When you’re ready, click Create.
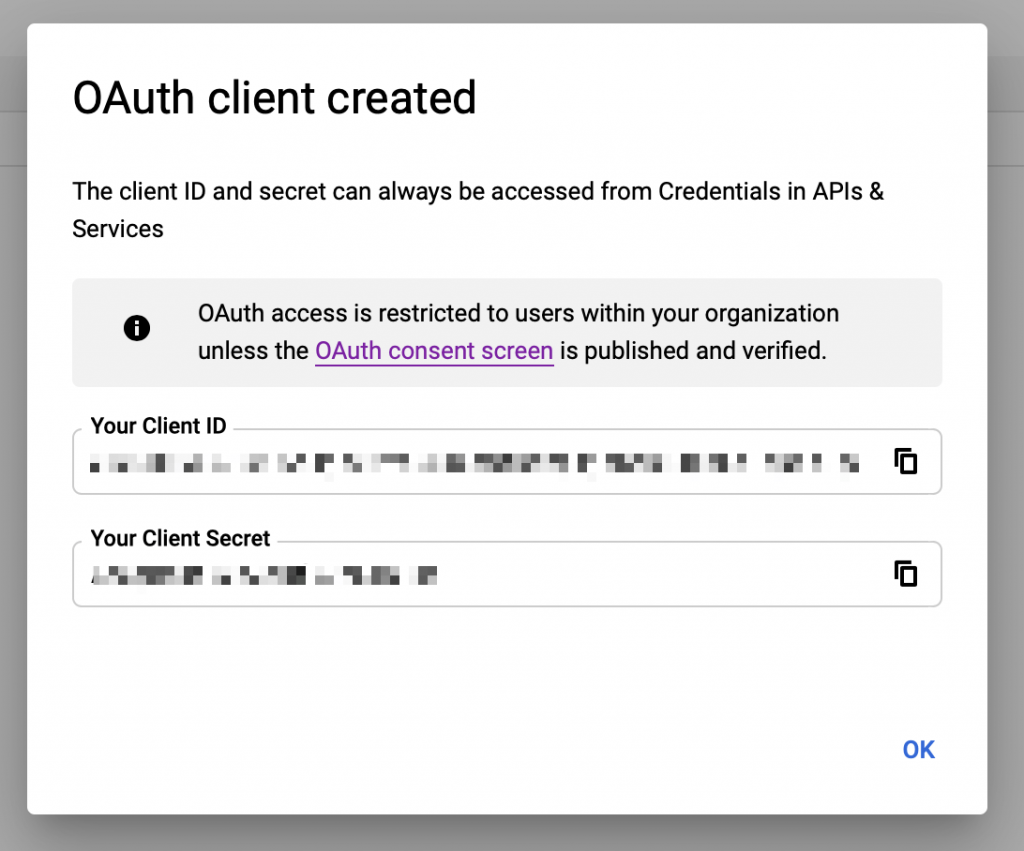
Another modal will appear with your Client ID and Client Secret credentials. Yay, we’re finally here!!! Copy each of these and paste them into the appropreate fields on the WP Mail SMTP » Settings sections
3. Authorize and Send Test Email
Copy the Client ID and the Client Secret. If you’ve clicked past the modal window you can still find the information by clicking on the name of your ID, or the pencil icon:

You’ll find the info here:

Your Client ID and Client Secret get entered on the WP Mail SMTP » Settings page as such:
The next step is to authorize your site to send emails through Google. Click on the big orange button to Allow plugin to send emails using your Google account:

This will open a new tab to the Google Authorization page. If you have multiple accounts you’ll need to choose the account associated with the email we’ve been setting up. Otherwise you’ll have been taken to the authorize screen:
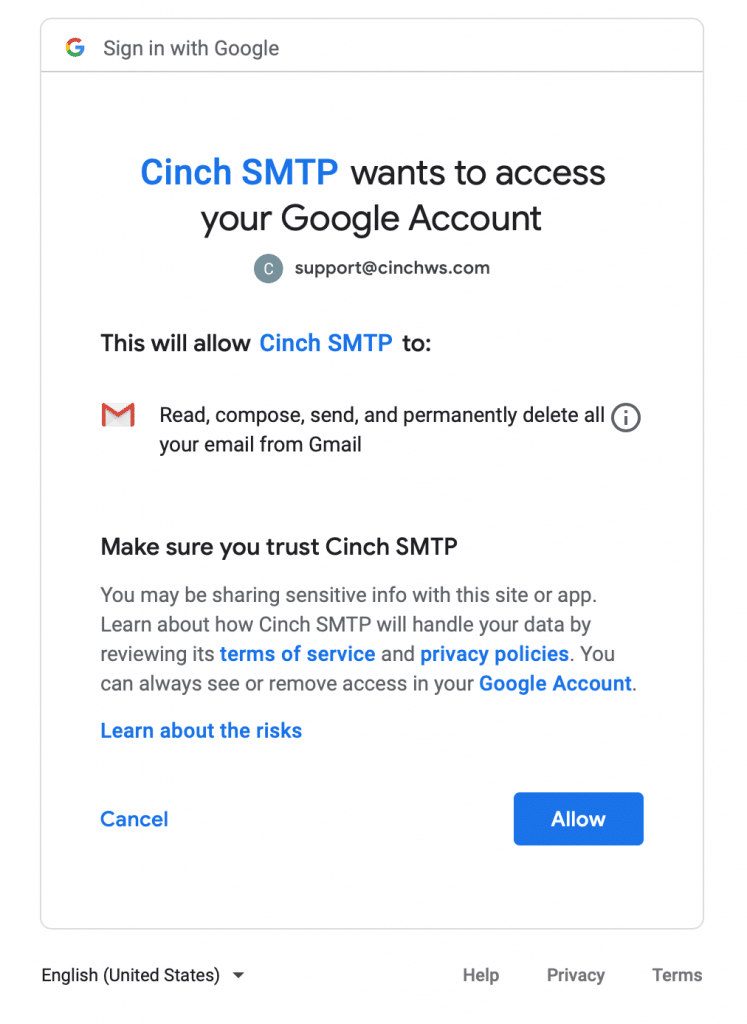
Click on the allow button. Wipe your brow knowing you’re only moments away. Head back to WP Mail SMTP » Settings » Email Test. Give the test a go. You should get an email and a nice little success message on the page:
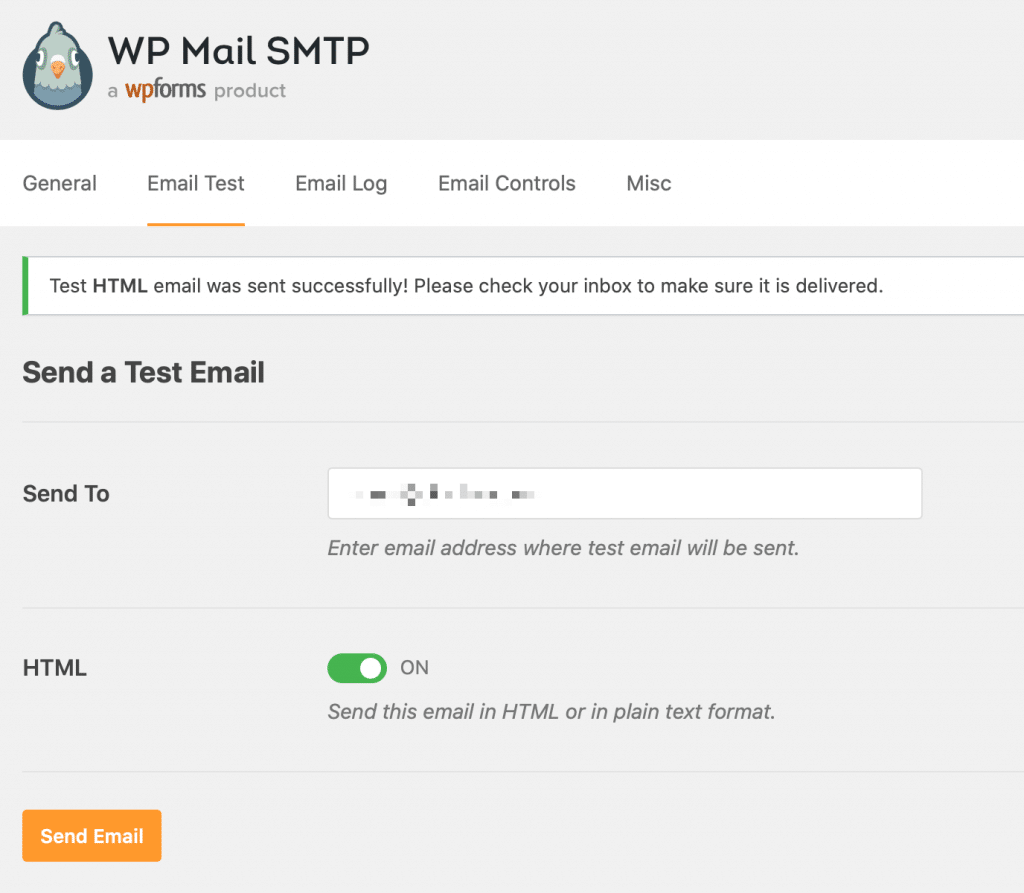
Congratulations, this was a big job but you’ve done it. Crack a beverage and know that your email deliverability issues are over.
Troubleshooting
Hopefully you didn’t run into any issues, but this is a complicated process and Google is notoriously finicky with these things. If you have trouble, reach out to us or start a chat and we’ll see what we can do to help. I’ll try to keep this page updated with new info as we learn more.
You can also check out the WP Mail SMTP documentation.
My Google account switched during setup
If you have multiple Google accounts and are logged into more than one at a time, you may find that Google switches back to your main account. This happened to me multiple times as I set this up for Cinch. Be sure you’re in the right account by checking the account icon in the upper right corner periodically. If it switches, click that dropdown and swap accounts. You may have to find your way back to where you were. Not sure why this happens. Could be because I use Safari and Google is simply punishing me for it.
1 Comment
Thank you a lot for your help!!!
Comments are closed.