So, you’ve made the virtual leap and have moved your business online. You built your site, downloaded the WooCommerce plugin and added your products… and now face the daunting task of figuring out shipping.
For many new ecommerce business owners, shipping can make or break your business. You don’t want to charge too much for shipping, lest you scare away potential customers – yet you don’t want to be left holding the bag, so to speak. Setting up WooCommerce shipping can be a delicate balance that varies from business to business, product to product.
The first decision you need to make is which carrier you’d like to use for shipping your products. Most people compare the big three: USPS, FedEx and UPS. Each service has its own pros and cons, but if you’re looking for the cheapest shipping option, USPS is the way to go.
Best WooCommerce Shipping Plugins for WooCommerce USPS Shipping Integration
There are TONS of free WooCommerce shipping plugins out there and plenty of great paid options, too. When it comes to simple shipping for WooCommerce, we recommend using WooCommerce’s premium plugin USPS Shipping Method ($79/year) and its free plugin WooCommerce Shipping & Tax (which calculates taxes and provides discounted and printable WooCommerce USPS shipping labels).
Why the official Woo plugins and not those from other developers? Combined, these two plugins make ecommerce shipping simple, streamlined and cost-effective while having dedicated support and updates from a trusted developer (aka WooCommerce).
USPS Shipping Method sources rates directly from the USPS API for reliable shipping rates and works seamlessly with the free WooCommerce Shipping & Tax, which handles tax calculation and payment processing setup and creates discounted shipping labels directly from your WooCommerce dashboard.
How to Set Up the WooCommerce USPS Shipping Method
Once you’ve installed both WooCommerce shipping plugins, it’s time to set up your shipping zones and shipping options.
USPS WooCommerce Shipping Options & Shipping Zones
In your Dashboard, go to WooCommerce –> Settings.
Then go to the Shipping tab and click on Add shipping zone.

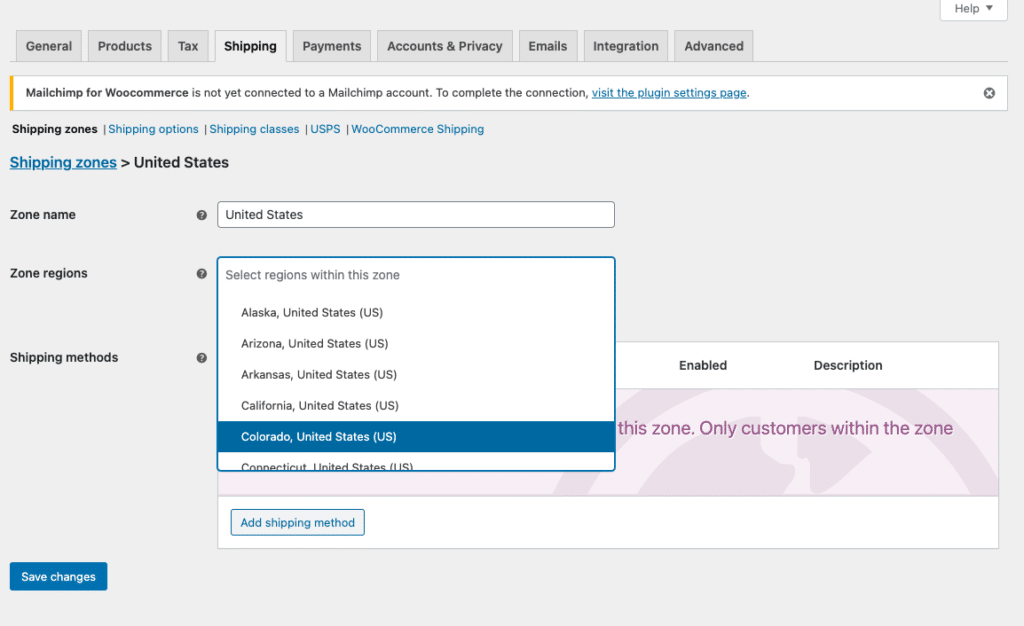
This is the first place where you can start to customize your shipping options via WooCommerce shipping zones. You can create as many zones as you like and make those zones as geographically wide or narrow as you please. For example, you can make a shipping zone for the entire United States, limit the zone to one or more states, or even limit the zone to a single zip code.
What is the purpose of WooCommerce shipping zones?
Good question. WooCommerce shipping zones allow you to set up different shipping options based on where items will be shipped. Want to make it simple by using the same shipping for every purchase in the United States? You only need to create one zone. Want to offer free local pickup or flat rate shipping to nearby locales? You can do that, too.
Shipping Methods vs Shipping Options
With the USPS Shipping Method plugin, the shipping method is the type of shipping (i.e.: flat rate, free shipping, local pickup, free shipping per product, USPS) and shipping options refer to specific settings (see below).
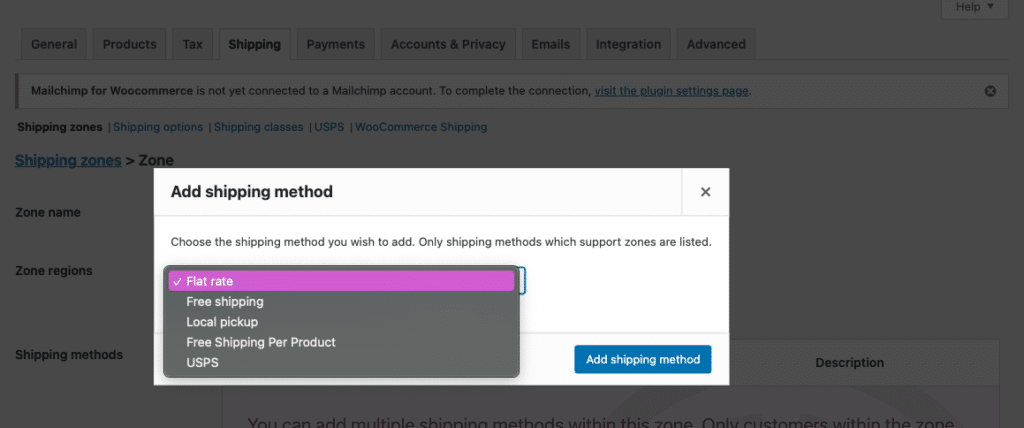
FYI: You can designate multiple shipping methods in a single shipping zone. If you plan to offer shipping through USPS, you must designate USPS as one of the zone’s shipping methods.
WooCommerce Shipping Classes
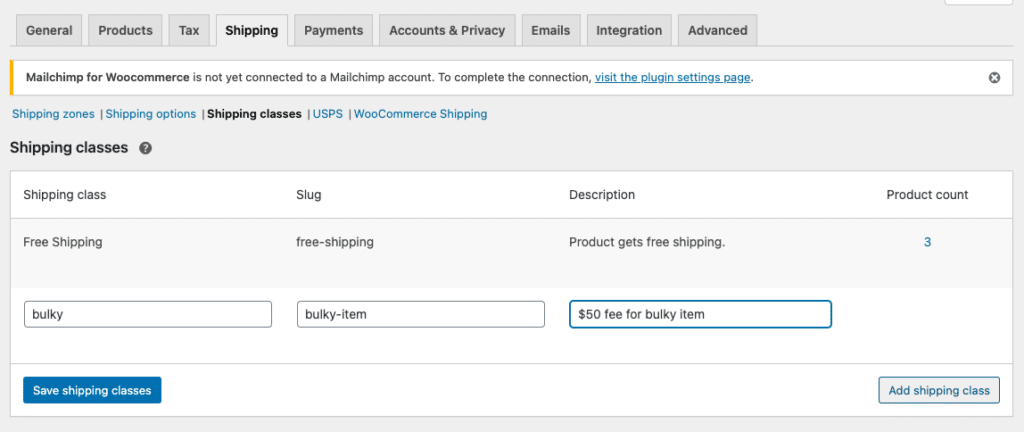
Setting up WooCommerce shipping classes can be extremely useful if your products vary greatly in weight, size, packaging, etc. For example, if you’ve set up flat rate shipping for all of your products but have one or two items that are much bulkier and will cost you more to ship, you can create and add a “bulky” shipping class to those products and charge a higher flat rate (e.g.: $50 instead of your standard flat rate of $10).
How to Configure USPS Settings in WooCommerce
Once you add the USPS shipping method to a shipping zone, you need to configure the USPS settings. Click on the shipping zone you’d like to edit and then click Edit under USPS in the Shipping Methods box.
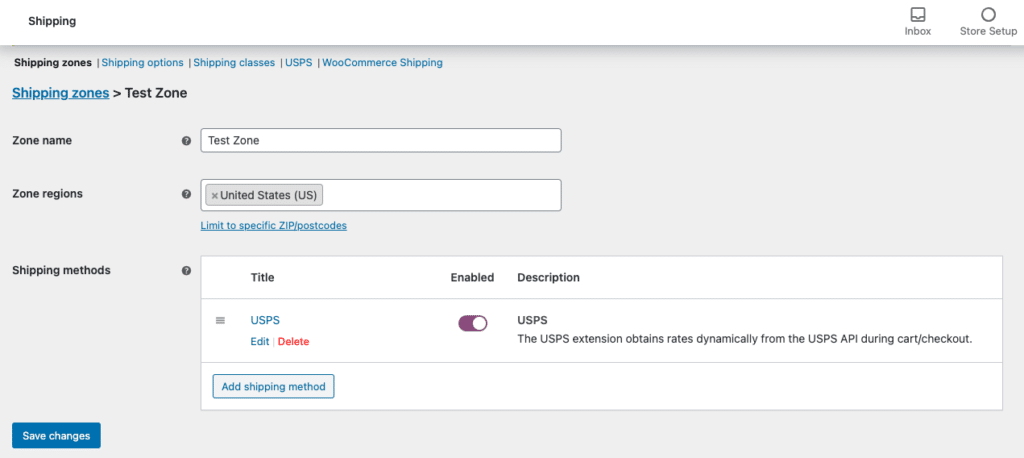
This is where you can set your rates, create fallback rates, designated flat rates or enable USPS API rates. The details can get a bit nitty-gritty, which is why we devoted an entire post to breaking down how to configure WooCommerce USPS settings and rates.
Flat Rate vs Parcel Packing Methods vs Box Packing
USPS Flat Rate Shipping
When enabled, the flat rate option uses the box packer (see below) to apply USPS box dimensions to provide a shipping quote based on USPS Flat Rate Services. Flat rate shipping costs are set by the USPS and cannot be modified. Using flat rate shipping for WooCommerce can make the shipping process simpler; however, it may not be the best economical option for your ecommerce business.
USPS Parcel Packing Methods
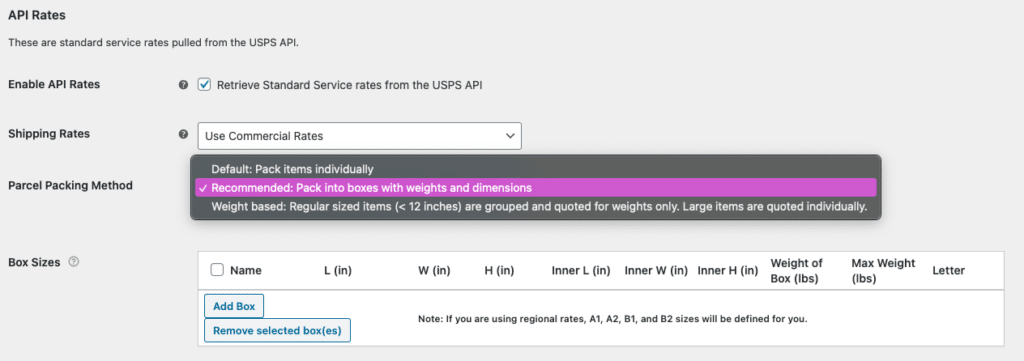
There are three different USPS packing methods: per-item, weight-based and pack into boxes. For per-item shipping, each item is sent to the USPS API and the items are combined to determine the shipping cost. With weight-based shipping, items smaller than 12 inches are grouped and quoted by weight and items larger than 12 inches are quoted individually.
USPS Shipping Method recommends using the third option, pack into boxes, where items packed into pre-defined boxes that are sent to the USPS API.
USPS Box Packer
The USPS box packer is volume-based and allows you to pack multiple items into a single package in which you set the height, width, length and maximum weight. If you choose to use the “Recommended: Pack into boxes with weights and dimensions” option, you will be given the opportunity to set your box sizes in the table below.
First, click “Add Box” and give the box a name. You’ll then need to input the outer dimensions of the box, the inner dimensions (i.e.: the outer dimensions minus the thickness of the box’s walls). Next, input the weight of the empty box and the maximum weight of your package once it is packed with items. To allow for an unlimited weight, enter 0 for the Max Weight.
