Setting up shipping in WooCommerce can be quite the task, as there are multiple steps to take and numerous settings and shipping options to consider. We’ll cover one of these aspects below: setting up WooCommerce USPS shipping rates and settings.
If you haven’t set up shipping with WooCommerce’s premium plugin USPS Shipping Method ($79/year) and its free plugin WooCommerce Shipping & Tax (which calculates taxes and provides discounted and printable WooCommerce USPS shipping labels), you can learn how to do so in our previous WooCommerce USPS shipping post.
WooCommerce USPS Shipping Integration
There are TONS of free WooCommerce shipping plugins out there and plenty of great paid options, too…
So why the official Woo plugins and not free or premium plugins from other developers?
USPS Shipping Method sources rates directly from the USPS API for reliable shipping rates and works seamlessly with the free WooCommerce Shipping & Tax, which handles tax calculation and payment processing setup and creates discounted WooCommerce USPS shipping labels directly from your WooCommerce dashboard.
Combined, these two plugins make ecommerce shipping simple, streamlined and cost-effective while having dedicated support and updates from a trusted developer (aka WooCommerce).
To put it simply, the small yearly cost is well worth the functionality and reliability. Speaking of functionality…
How to Configure USPS Settings and Set Up WooCommerce USPS Shipping Rates
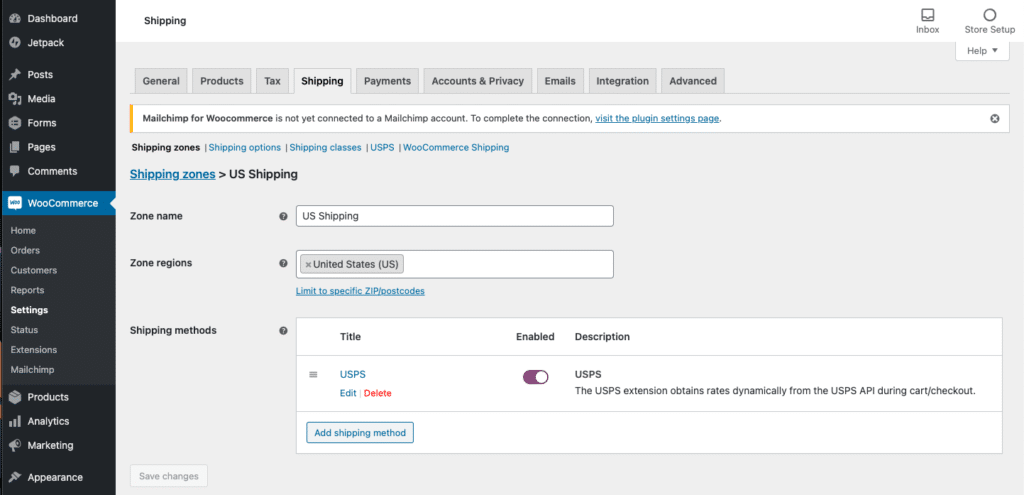
After you’ve added the USPS shipping method to a shipping zone, it’s time to edit the shipping method to your preferred settings. Click on the shipping zone you’d like to edit and then click Edit under USPS in the Shipping Methods box.

Next, you’ll see Method Title, Origin Postcode, Tax Status, Offer Rates and Fallback (in order).
Method Title is the name of the shipping method that is visible to customers at checkout. Unless you have reason to, it’s best to keep this as USPS.
The Origin Postcode is the postcode from which the items will be shipped and it is a required field.
For most ecommerce stores, the Tax Status will be “Taxable.” You should check with federal and state regulations if you think your items are non-taxable.
Offer Rates are the shipping rates determined by the USPS API. Here you’ll need to choose whether you want to show your customers all of the applicable USPS shipping rates or only the cheapest rate available.
Fallback is the shipping price WooCommerce will use as a – you guessed it – fallback in case USPS doesn’t return any matching rates for a customer’s order. This allows the customer to continue checking out without assistance. If you want to use a fallback shipping cost, enter the amount without a dollar sign (e.g. 10.50); if you don’t want to designate a fallback shipping cost, leave the field blank.
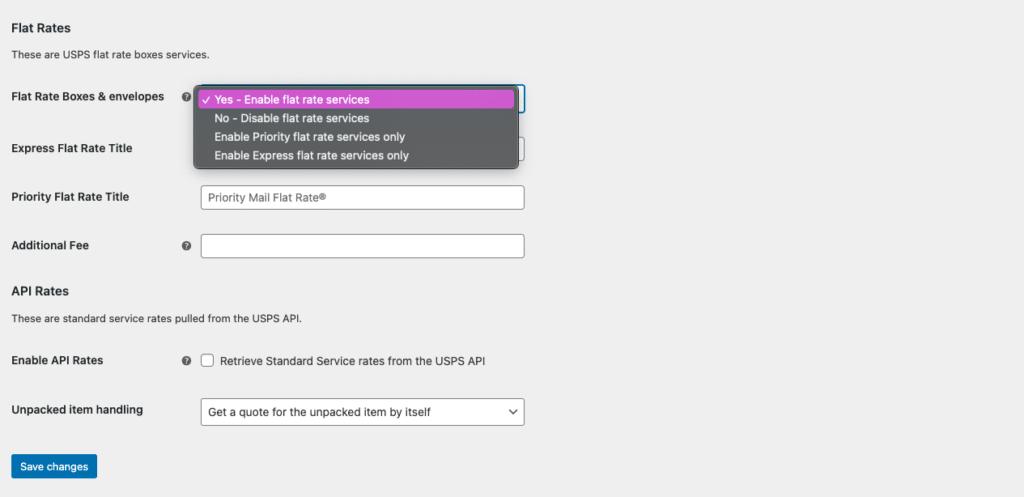
Now it’s time to decide on whether you want to use only USPS Flat Rate Boxes and envelopes, USPS API rates or both. If you choose to enable Flat Rates, you will see the four options below.

USPS Flat Rate services can help simplify your WooCommerce shipping, particularly if you sell smaller items that easily fit into one of the Priority Mail Flat Rateä Envelopes (Legal, Letter, Gift Card, Padded, Small, Window) or Boxes (Small, Medium 1 and 2, Large, APO/DPO/FPO Large, Large Board Game, Prepaid Forever® Packaging).
As we recommended with the Method Title, it’s best to keep the default Express Flat Rate Title and Priority Flat Rate Title. If you’d like to add an Additional Fee to each box, which can be used to help cover miscellaneous shipping costs for your WooCommerce store. This fee can be entered as a static amount (e.g. 3.50) or as a percentage (e.g. 5%).
Setting Up WooCommerce USPS API Rates
If you decide to use USPS API rates, the WooCommerce Shipping Method plugin will automatically apply standard service rates directly from USPS.
This is where things can get a bit complicated… though understanding your shipping and packing options can save you (and your customers) a lot of money in shipping costs over the long-term.
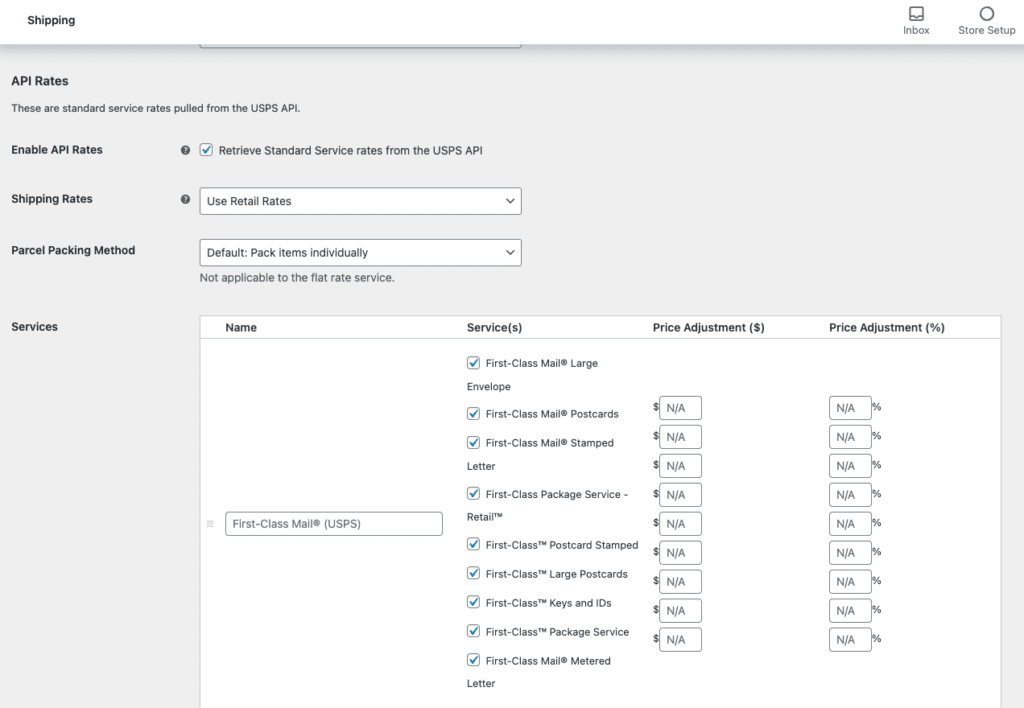
First, click the box to Enable API Rates. Once clicked, your screen will look as below.

Next, if you have the free WooCommerce Shipping & Tax as we recommended, change the Shipping Rates from “Use Retail Rates” to “Use Commercial Rates.” Printing shipping labels with WooCommerce Shipping & Tax qualifies your business for commercial rates.
Now for the big decision: Parcel Packing Method.
You have three options when deciding on a Parcel Packing Method: pack items individually (default), pack into boxes with weight and dimensions (recommended) and weight-based.

No matter which packing method you choose, you will need to decide on what USPS shipping services to offer to your customers. By default, all of the services will be enabled, as you can see two screenshots above. Uncheck any unwanted services and add price adjustments (by dollar amount or percentage, not both) as you see fit.
If you decide to stick with the default Parcel Packing Method of packing items individually, each item is sent to the USPS API individually and the items are combined to determine the final shipping cost.
With weight-based shipping, items smaller than 12 inches are grouped and quoted by weight and items larger than 12 inches are quoted individually.
If you go with the method recommended by USPS Shipping Method, pack into boxes with weights and dimensions, you’ll need to pack items into pre-defined boxes that are sent to the USPS API. To do this, you’ll use the USPS box packer.
USPS Box Packer
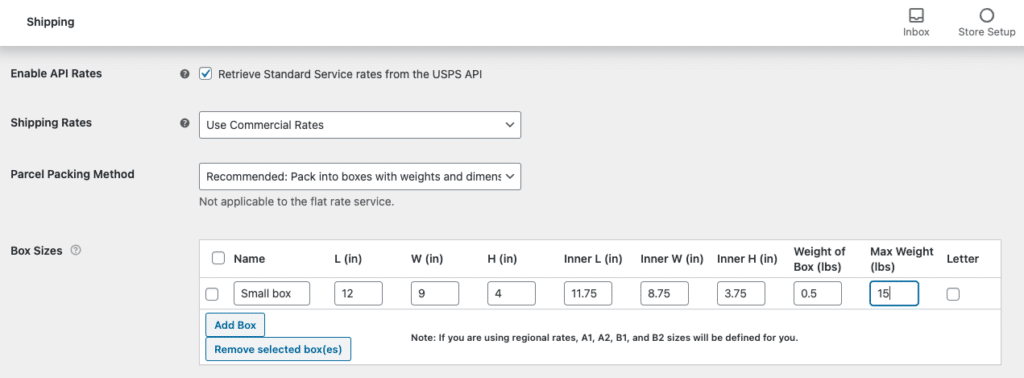
The USPS box packer is a volume-based WooCommerce shipping calculator that allows you to pack multiple items into a single package. To use the USPS box packer, you first need to input the Box Sizes (length, width, height, box weight and maximum weight) for the boxes you have decided to use for shipping.

First, click “Add Box” and give the box a name. You’ll then need to input the outer dimensions of the box, the inner dimensions (i.e.: the outer dimensions minus the thickness of the box’s walls). Next, input the weight of the empty box and the maximum weight of your package once it is packed with items. To allow for an unlimited weight, enter 0 for the Max Weight.
You will need to do this for every sized box you plan to use for shipping.
What’s next?
Learn how to add WooCommerce shipping classes to products.
(POST PENDING… Check back soon!)